Guide: Replacing textures in Wild Life
For demonstration we will edit the skin texture of Alissa.
Software prerequisites
You will need the following tools:
- A photo editor, e.g. GIMP, Krita or Photoshop.
- FModel (v4.4.3.5 or later): Follow the installation instructions here.
- UE4-DDS-Tools (v0.5.6 or later): Download the GUI version here and unzip it anywhere you like.
- repak (v0.2.1 or later): Download
repak_cli-x86_64-pc-windows-msvc.ziphere. Instructions on how to use it are given in Step 4 below.
Step 0: Set up FModel
We will use FModel to inspect the game files and extract textures.
Start FModel. You will be greeted with a prompt like this:
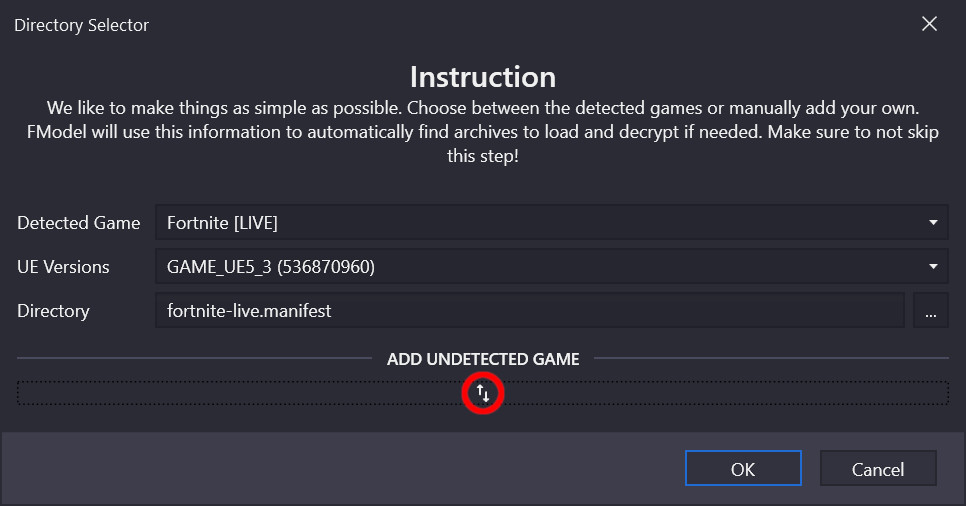
Click on the up/down arrow icons under "add undetected game", fill in the details for your WL install as shown below, and then click on the ➕ icon:
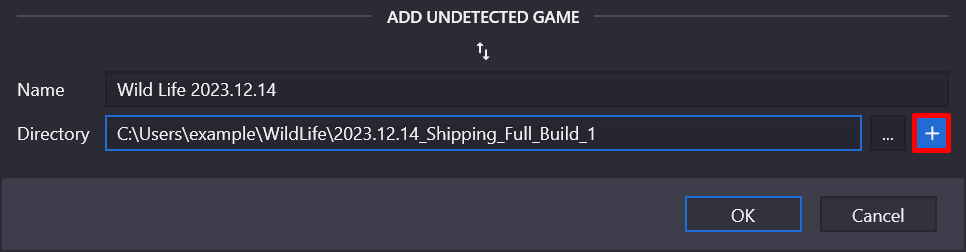
After you've clicked on ➕, choose the right UE version and then click OK (for the 2023.12.14 build the UE version is 5.3):
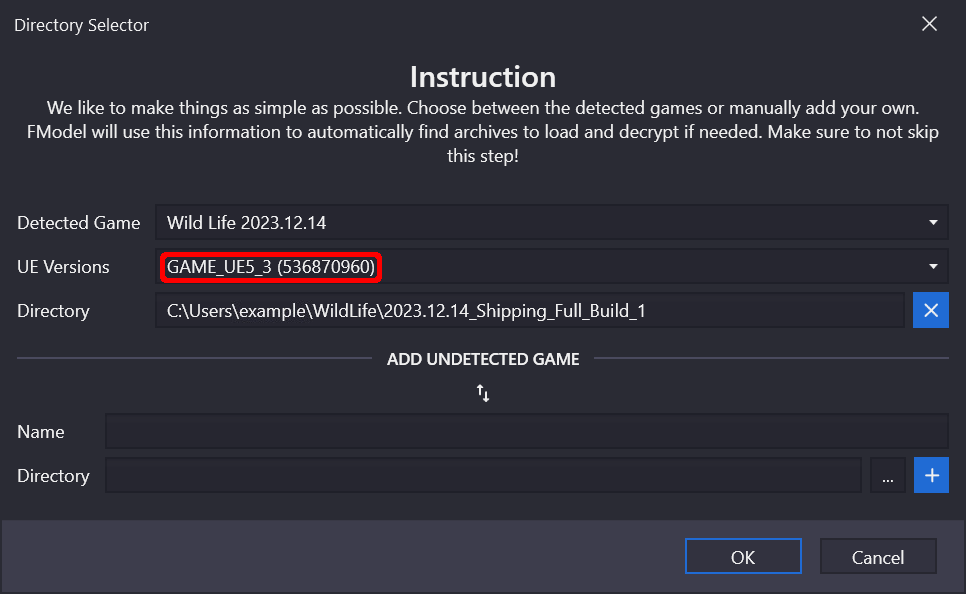
You should then see something like this:

Step 1: Extract texture
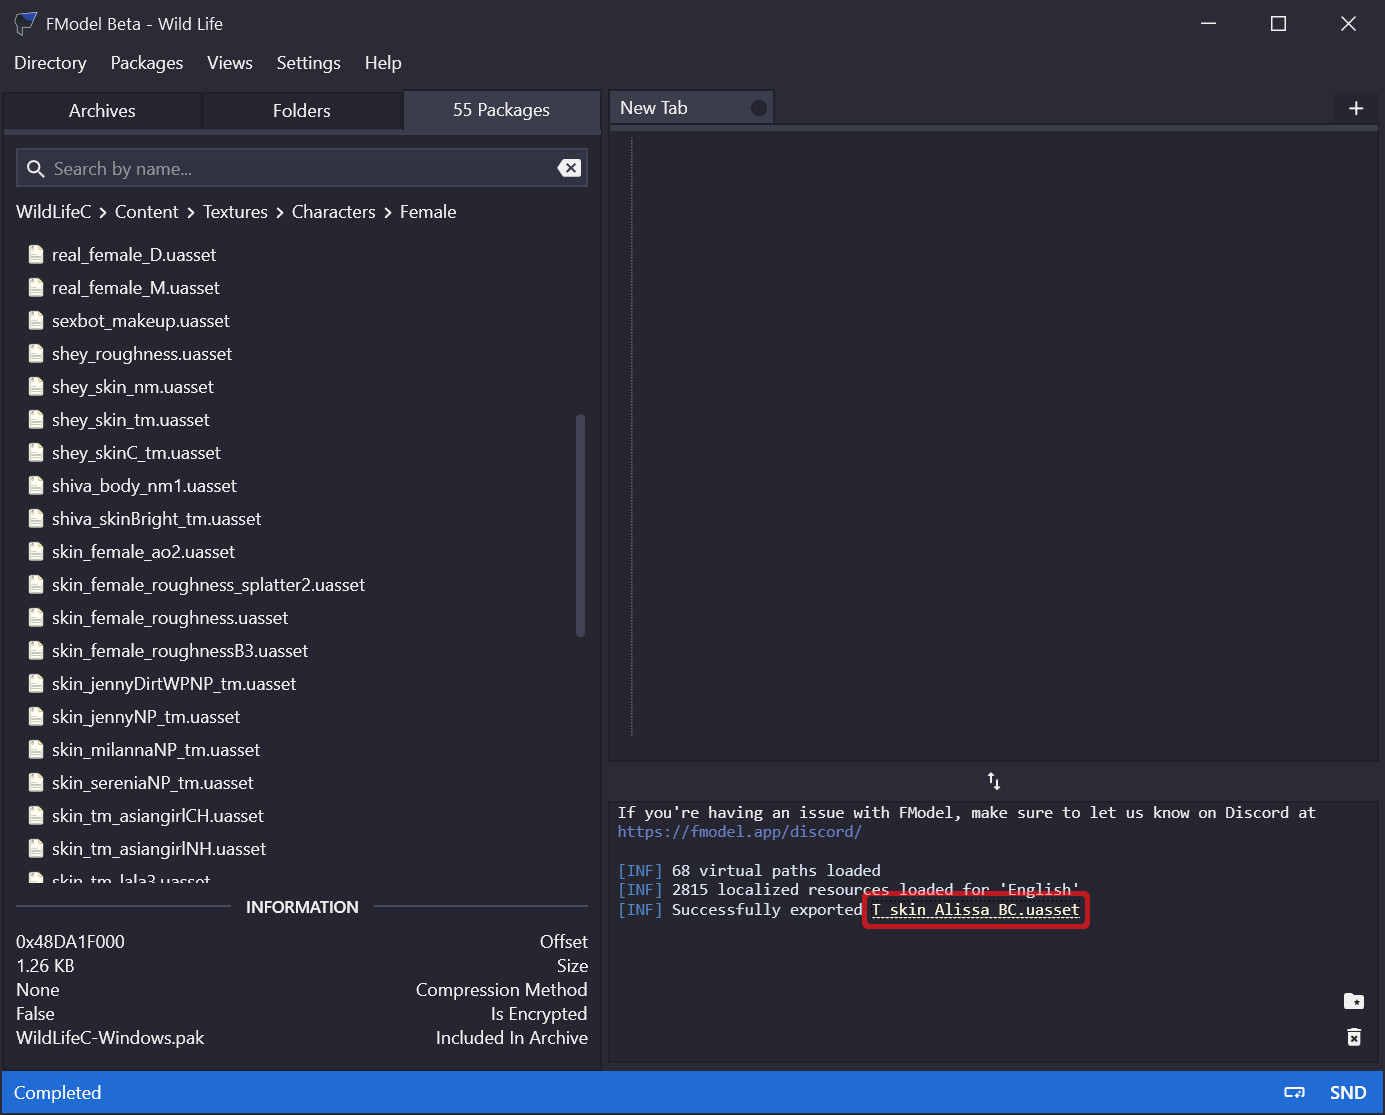
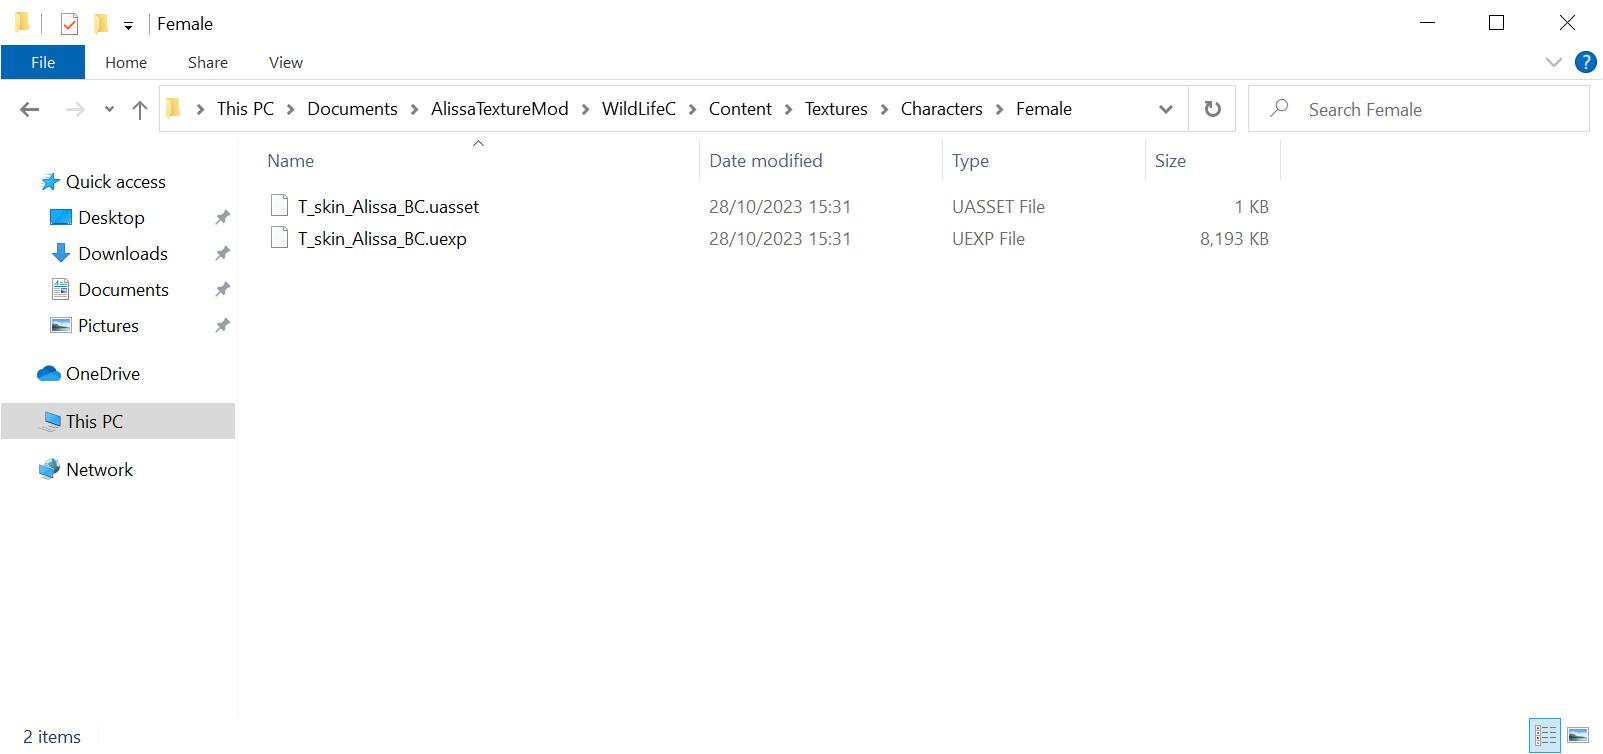
In FModel: Double-click on WildLifeC-Windows.pak. This will cause a kind of directory explorer to appear. Expand the WildLifeC directory; then navigate to Content → Textures → Characters and double-click on the Female directory within (see left image below).
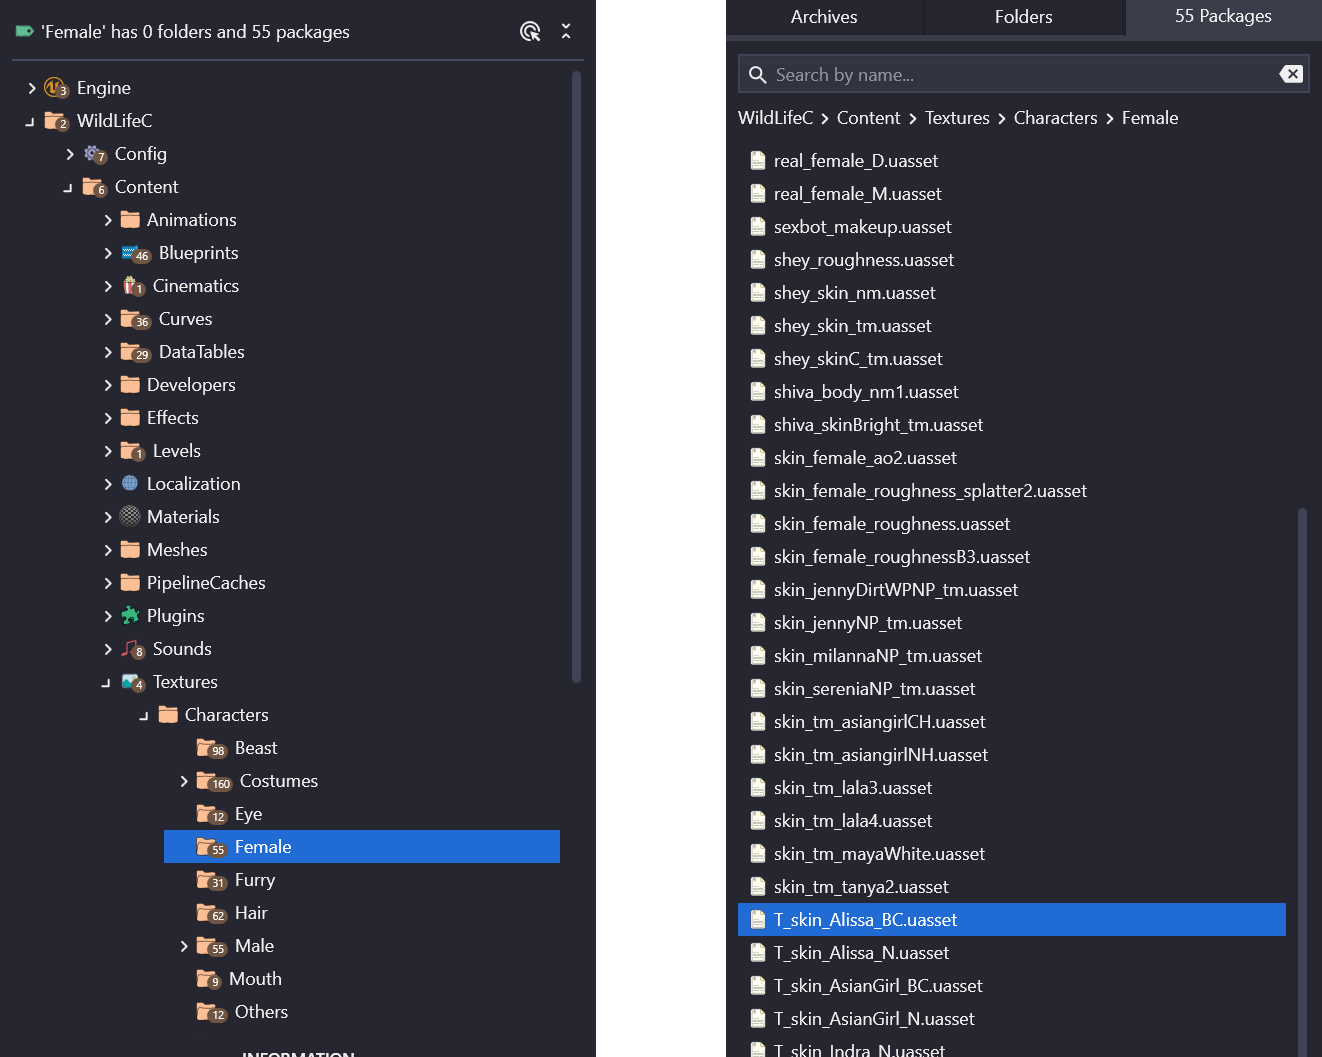
A list of .uasset files will appear (see right image above). Find the file T_skin_Alissa_BC.uasset, right-click on it and select “Export raw data (.uasset)”.
Tip: FModel can preview the game files if you supply it with a mapping file. Such files are available here and can be applied through the settings menu in FModel. (If no file is available for your build, try using the latest available file.)
You should see the message “Successfully exported T_skin_Alissa_BC.uasset” in the bottom-right panel:
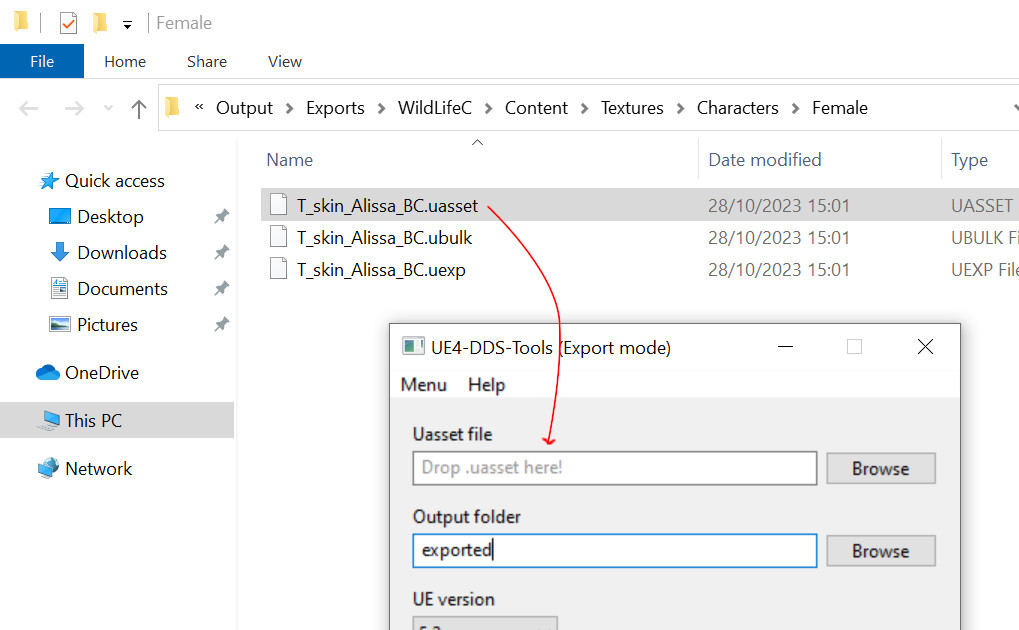
Click on the underlined filename in the message; that will bring you to the place where the .uasset file has been extracted (together with a .ubulk and a .uexp file).
Step 2: Edit texture
Now start the UE4-DDS-Tools-v0.5.6-GUI tool. Switch it to “export mode” by going to Menu → Export. Then drag and drop the .uasset file into the “uasset file” input:
Then choose any output folder you like (I will use C:\Users\example\Documents\WL_Export), adjust the settings as shown in the image below and click Export:
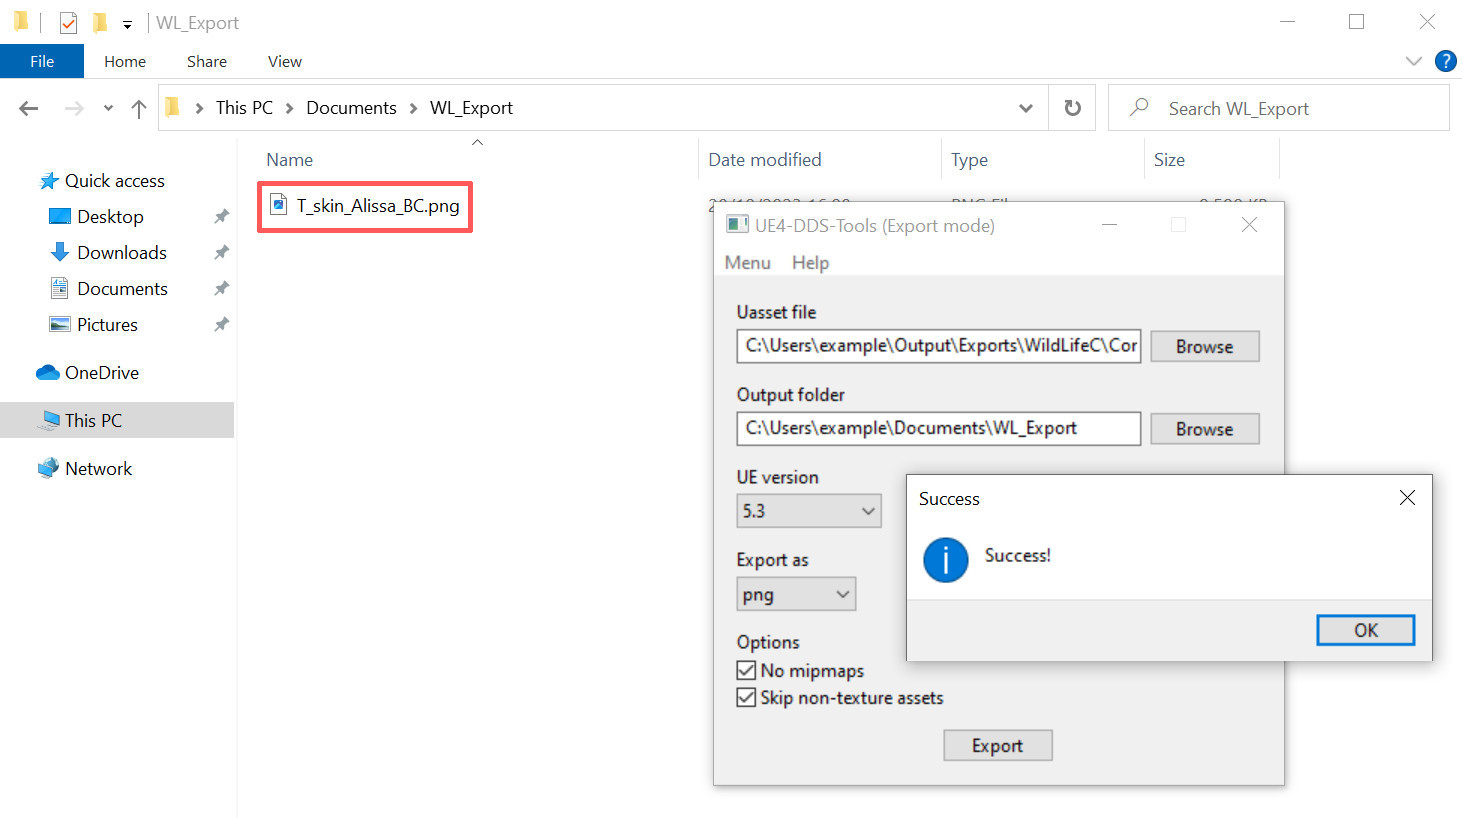
You should then see a message saying “success”, and the program should have produced a file called T_skin_Alissa_BC.png in the export directory you specified.
Now open T_skin_Alissa_BC.png in your photo editor, make the changes you would like, and then save the file.
Tip: The texture may look strange to you, but it actually follows the usual UV unwrap scheme for 3D models. This message on the official WL discord provides a tip that can be useful for adding tattoos and such.
Step 3: Create new .uasset
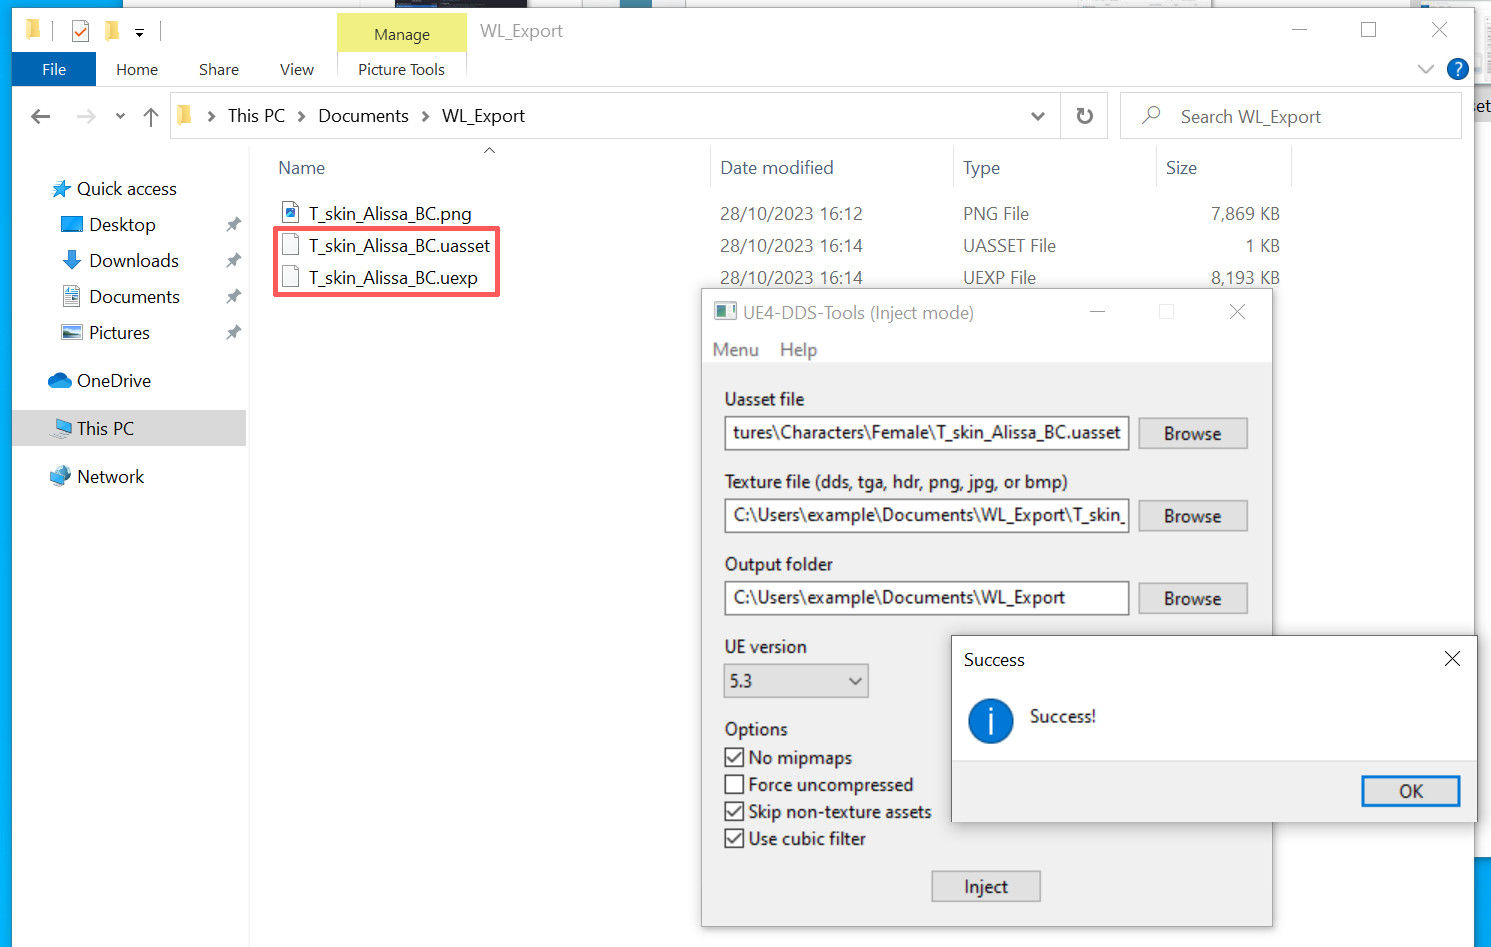
Using UE4-DDS-Tools-v0.5.6-GUI again: Switch it to “inject” mode by going to Menu → Inject. Then fill out the details as listed below and click Inject:
- Uasset file: the file from Step 1.
- Texture file: your edited .png file.
- Output folder: Choose any folder you like (I'll use the folder containing the .png).
You should see a success message, and the tool should have created a .uasset and a .uexp file in your output folder:
Step 4: Create .pak
Now all that remains is to create a .pak file that we can put into the WildLifeC Paks subdirectory. For this we will need to create a special directory structure and then use the repak tool. Follow these steps:
- Create a new directory anywhere you like, I'll call mine
AlissaTextureMod. - Go to the directory from Step 1 (the one containing the original .uasset, .ubulk and .uexp files). Then navigate up until you hit the
Exportsdirectory. Copy theWildLifeCdirectory withinExportsintoAlissaTextureMod:

(This is just to make sure that we have the right directory structure.)
Then navigate down into AlissaTextureMod\WildLifeC\Content\Textures\Characters\Female and delete the files there (these are the original .uasset, .ubulk and .uexp file). Now copy your files from Step 3 into the directory (the .uasset and .uexp that you got from using DDS-Tools in inject mode):
Now unpack the repak_cli-x86_64-pc-windows-msvc.zip that you downloaded in the prerequisites step and copy the repak.exe file to the folder containing AlissaTextureMod:
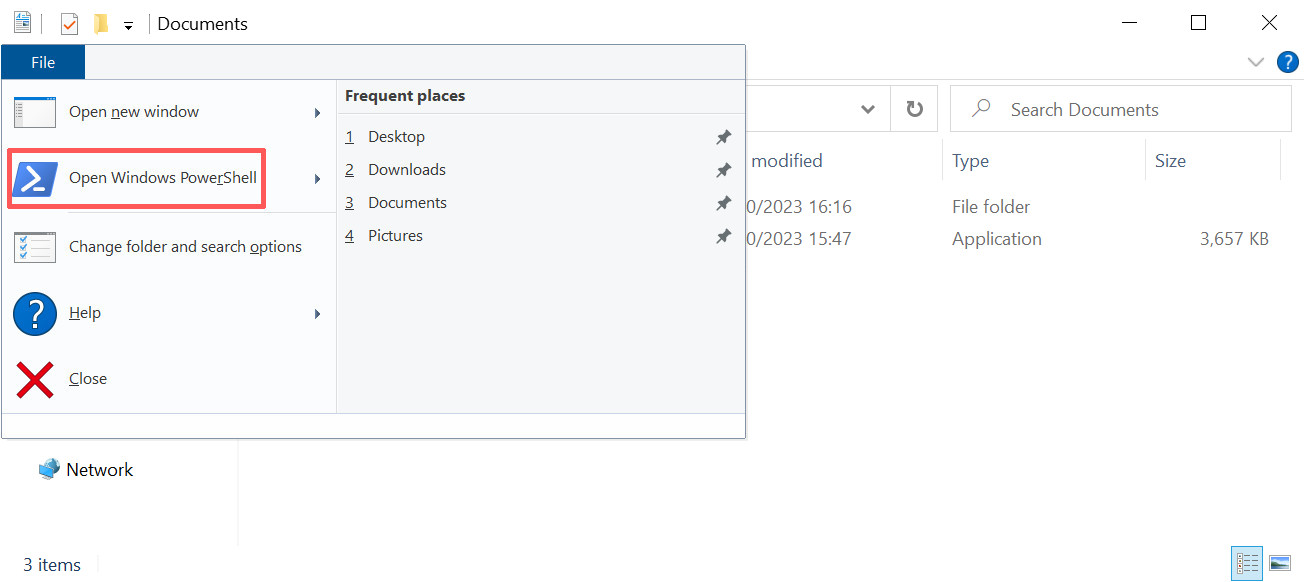
In the Windows Explorer: Go to the folder containing AlissaTextureMod and choose File → Open Windows PowerShell:
Type the following in the PowerShell window and hit enter:
.\repak pack AlissaTextureModYou should see the following message:
Packed 2 files to AlissaTextureMod.pak(repak is telling us that it has packed the .uasset and .uexp files.)
Step 5: Install .pak
Finally, rename the AlissaTextureMod.pak to AlissaTextureMod_P.pak (to ensure that it takes precedence over original WL files) and then copy it into your WildLifeC Paks subdirectory, e.g. mine is located at:
C:\Users\example\WildLife\2023.12.14_Shipping_Full_Build_1\Windows\WildLifeC\Content\PaksStep 6: Try it out
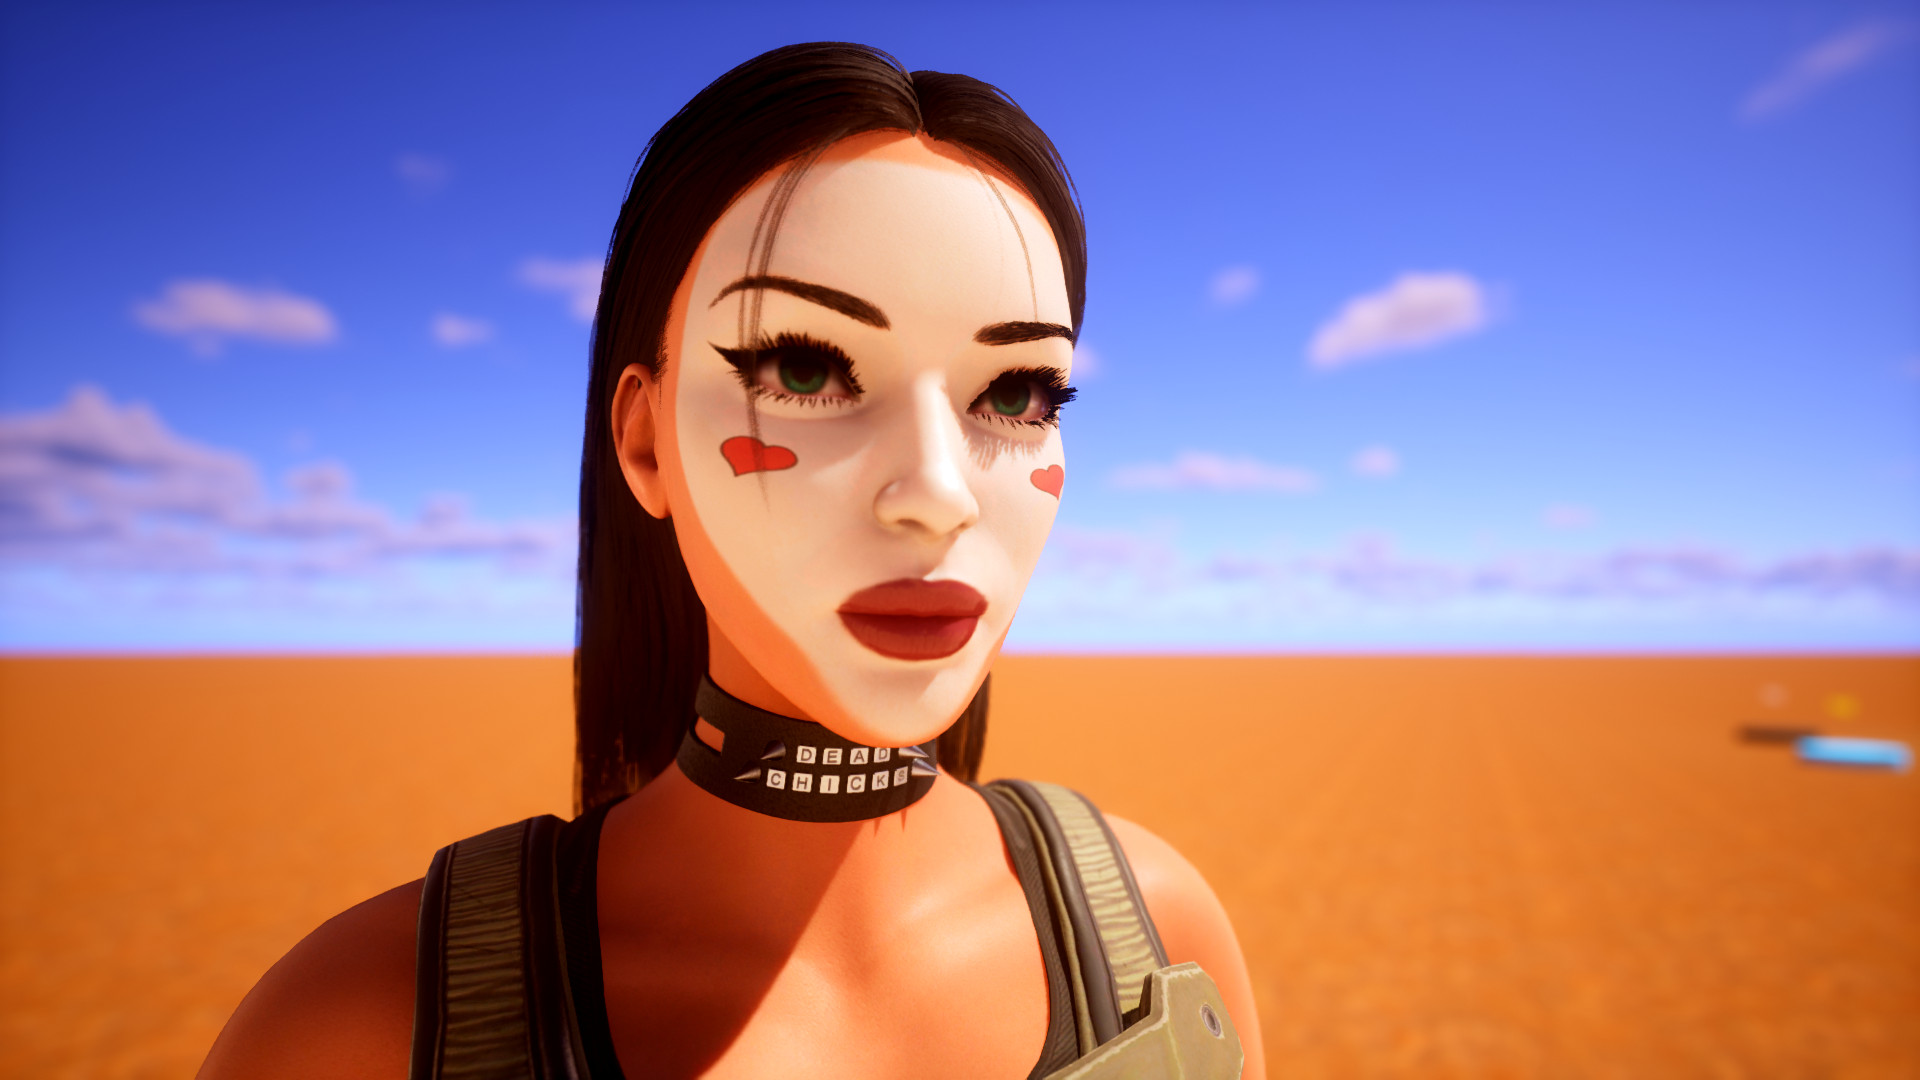
Start the game and spawn default Alissa. You should see your texture appearing:
Credits
This guide is adapted from the following excellent one, but any mistakes are my own:
https://github.com/MoolahModding/site/blob/main/docs/modding-basics/texture-replacement/index.md